Installing a failover cluster
Introduction
In this lab, you will learn how to install a failover cluster.
Objectives
At the end of this lab, you will be able to:
- Install failover clustering feature on the clustering nodes
- Validate cluster nodes for install
- Install a failover cluster
- Review the installed cluster
Estimated Time
75 minutes
Logon Information
Before Login make sure windows has Applied Computer Setting to all nodes.
Use the following credentials to login into virtual environment
Connect to AlwaysOnClient as Administrator using Pa$$w0rd as the password.
Click the Type Text icon to enter the associated text into the virtual machine.
Connect to AlwaysOnN1 as Administrator using Pa$$w0rd as the password.
Click the Type Text icon to enter the associated text into the virtual machine.
Connect to AlwaysOnN2 as Administrator using Pa$$w0rd as the password.
Click the Type Text icon to enter the associated text into the virtual machine.
Connect to AlwaysOnN3 as Administrator using Pa$$w0rd as the password.
Click the Type Text icon to enter the associated text into the virtual machine.
Connect to AlwaysOnDC as Administrator using Pa$$w0rd as the password.
Click the Type Text icon to enter the associated text into the virtual machine.
Change the screen resolution if required.
You may want to adjust the screen resolution to your own preference. Do this by right-clicking on the desktop and choosing Screen resolution and clicking OK when finished.
Exercise 1: Install Failover Clustering Feature on the 3 cluster nodes.
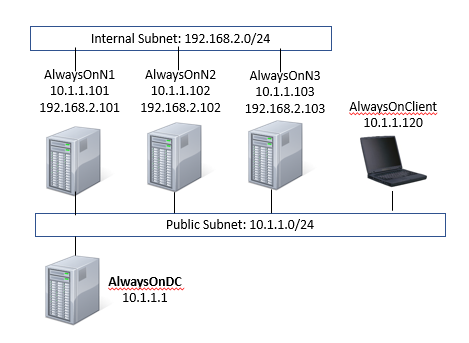
Before you begin with the first exercise in the lab, let's review the lab environment.
In the lab, you have one Domain Controller and 3 nodes + 1 client computer.
AlwaysOnN1 and AlwaysOnN2 nodes are in the primary Datacenter.
AlwaysOnN3 is in the secondary datacenter.
For this lab, both the datacenters are in the same subnet.
Each node has Windows Server 2022 O/S installed.
Task 1: Enable Failover Clustering Feature using Server Manager on Node 1 (AlwaysOnN1)
In this task, you will use Server Manager to install the Failover Clustering feature on cluster node1 AlwaysOnN1.
Sign in to AlwaysOnN1 as Administrator using Pa$$w0rd as the password.
Click the Type Text icon to enter the associated text into the virtual machine.
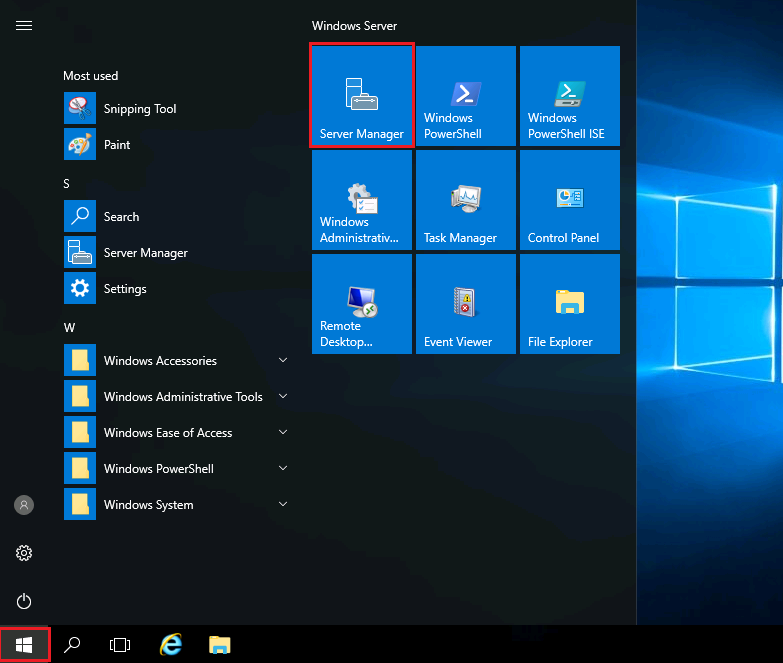
Click on the Start button and then click Server Manager.
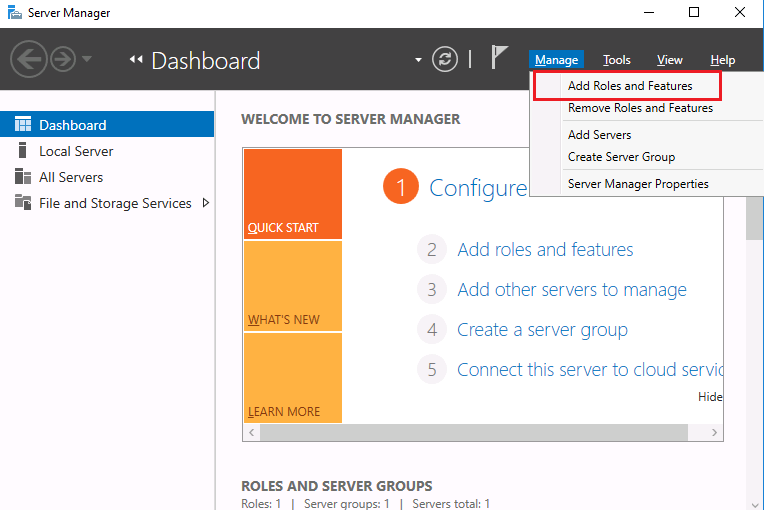
Under the Manage menu item, click on Add Roles and Features.
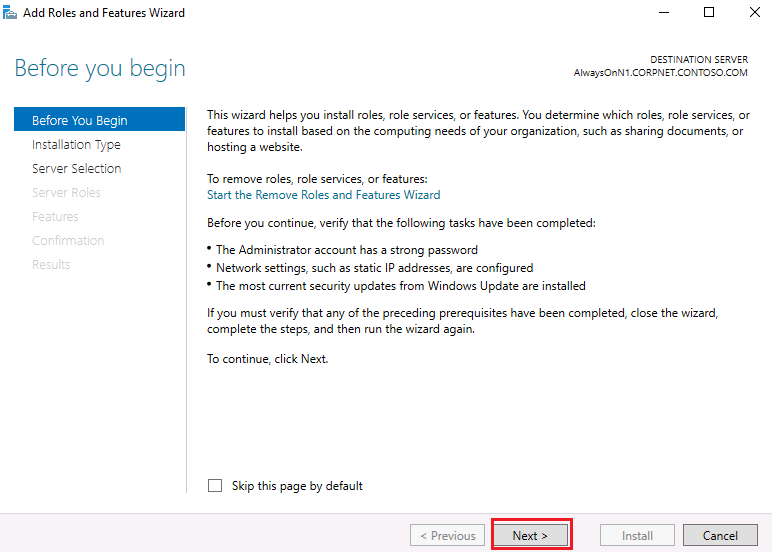
The Add Roles and Features Wizard will pop-up. Review the intro screen content and then click on Next.
Select Role-based or feature-bases installation and click Next.
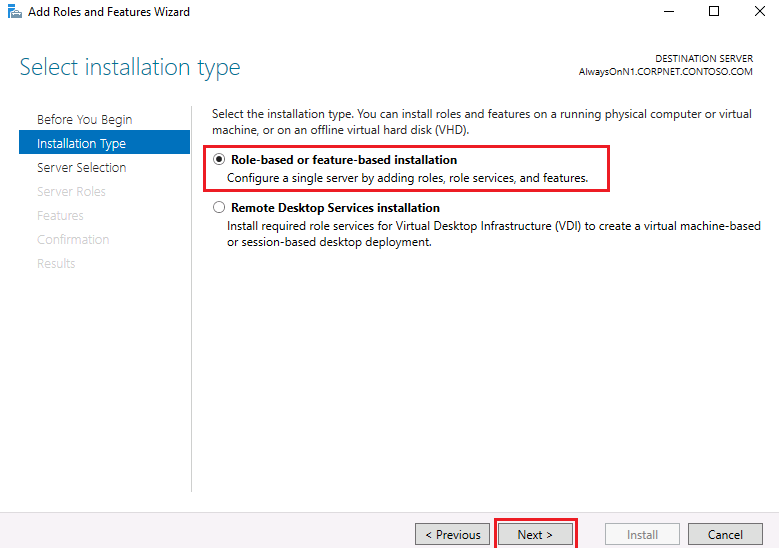
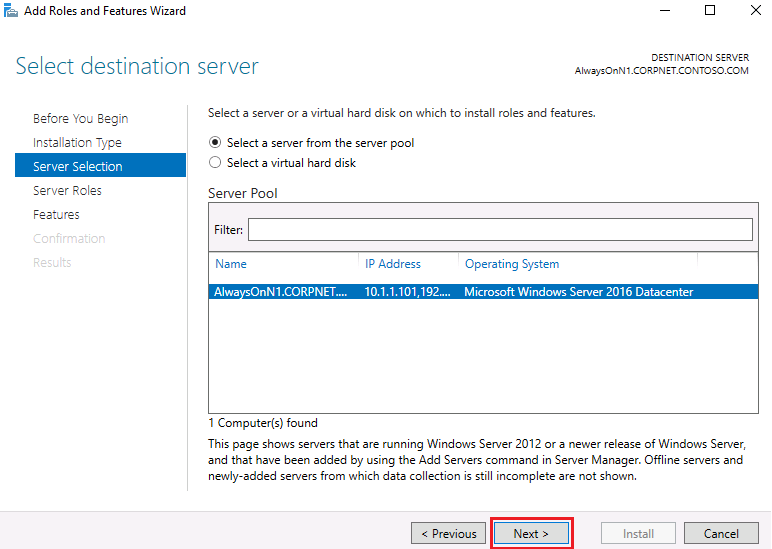
AlwaysOnN1 server would should up under the server pool. Choose Select a server from the server pool option and click Next.
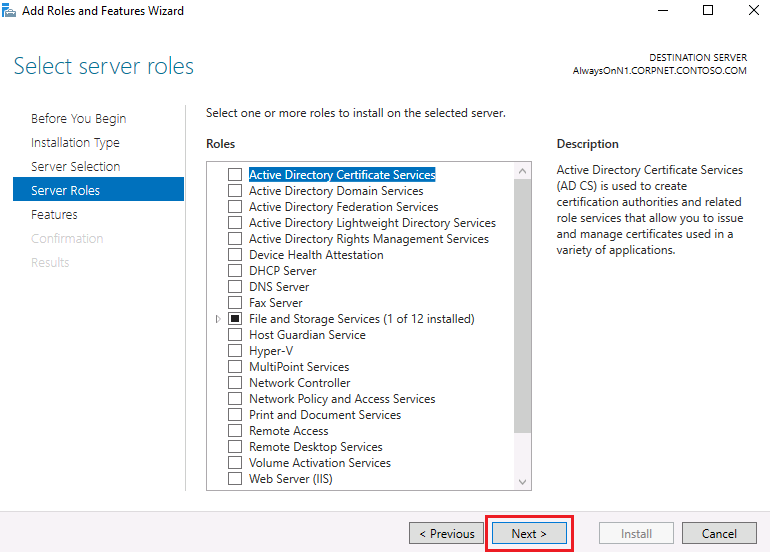
On the Select server roles screen, just click Next as you won't be making any selections here.
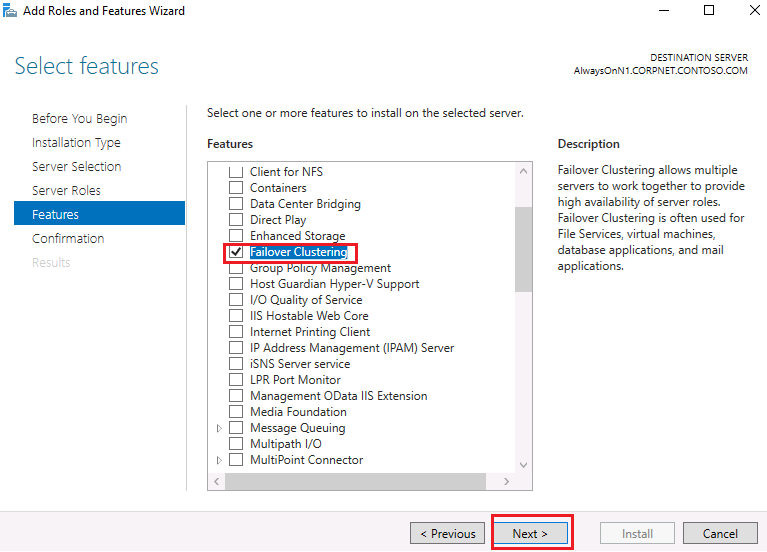
In the Select features screen, select Failover Clustering and then click on Add Features.
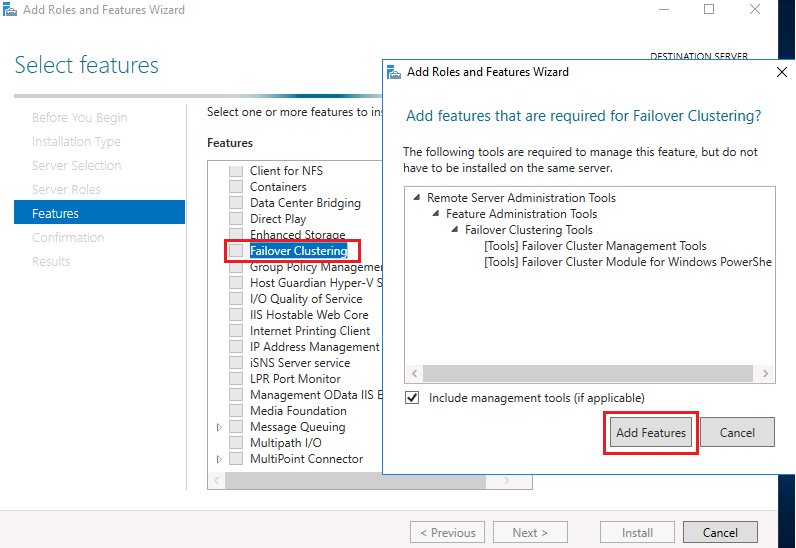
Now, click Next.
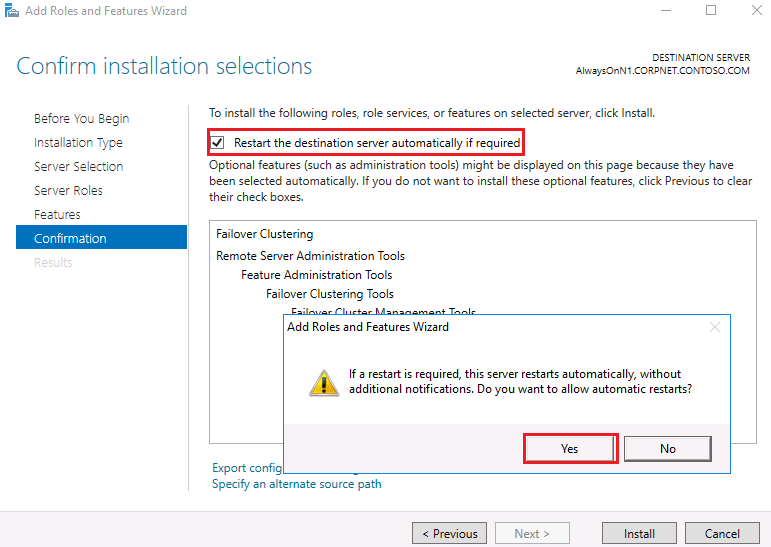
In the Confirm installation selections screen, check the Restart the destination server automatically if required check box and then click Yes.
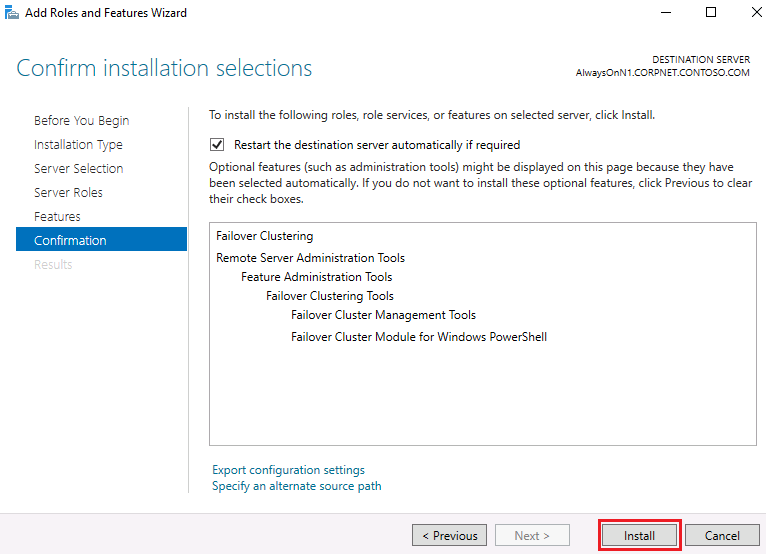
Click Install.
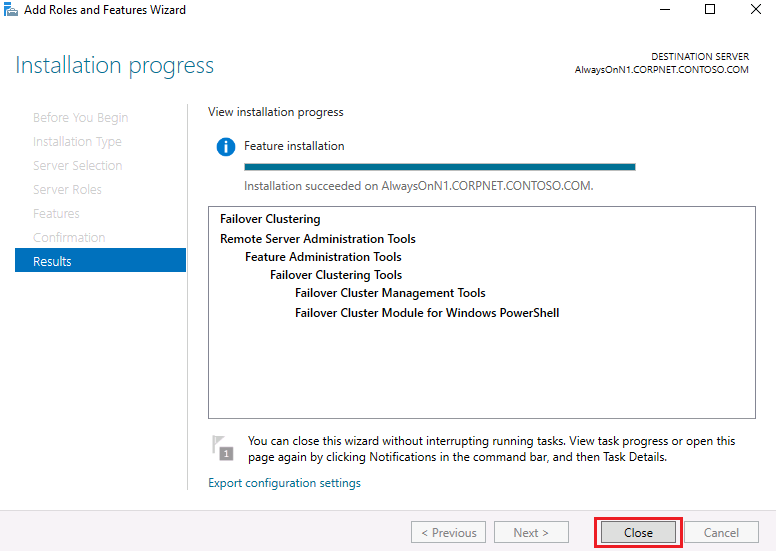
Click Close on the Installation progress screen after the installation is complete.
Task 2: Enable Failover Clustering Feature using PowerShell on Node 2 (AlwaysOnN2) and Node 3 (AlwaysOnN3).
In this task, you will use PowerShell to install the Failover Clustering feature on AlwaysOnN2 and AlwaysOnN3.
If you would like to use Server Manager to enable the Failover Clustering Feature on the remaining nodes, then repeat the steps performed in the previous task on the remaining 2 nodes.
Sign in to AlwaysOnN2 as Administrator using Pa$$w0rd as the password.
Start an elevated Windows PowerShell:
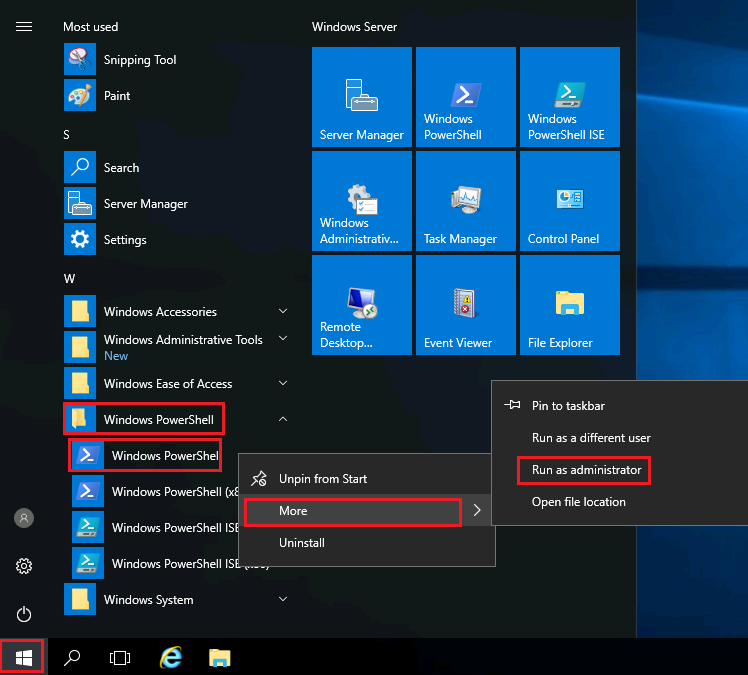
Click Start > Windows PowerShell >right-click Windows PowerShell > More > select Run as administrator.
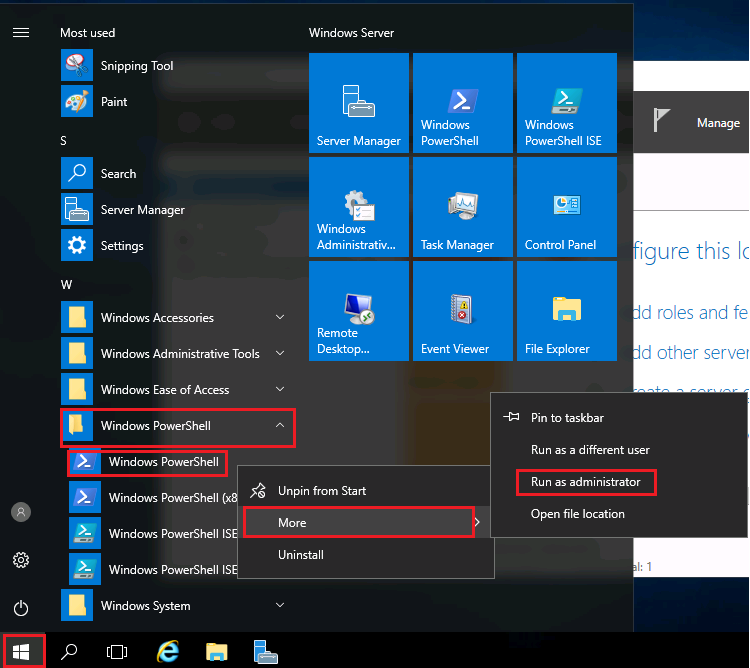
In Windows PowerShell, type the following command.
PowerShellInstall-WindowsFeature “Failover-Clustering” -IncludeManagementTools
Now connect to Node 3 AlwaysOnN3, and repeat steps 2 and 3 on the server.
Congratulations!
You have successfully completed this exercise. Click Next to advance to the next exercise.
Exercise 2: Validate cluster nodes and review report.
In this exercise, you will learn how to validate cluster nodes and review report.
Task 1: Validate a Cluster Configuration
The cluster validation wizard performs an extensive series of tests to ensure that your system is correctly configured and prepared to function as a failover cluster. The cluster validation wizard results can be saved as a report.
On AlwaysOnN1, ensure that you are signed in as Administrator using Pa$$w0rd as the password.
Click on the Start button, then click on Windows Administrative Tools > Failover Cluster Manager.
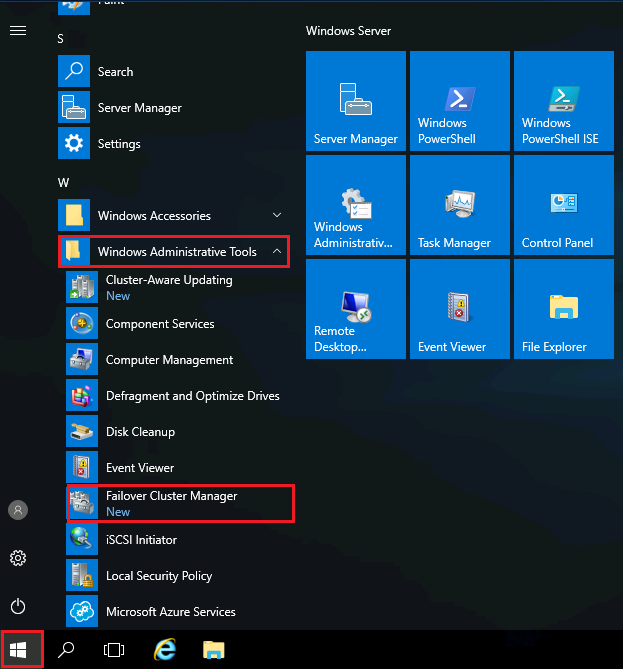
Click on Validate Configuration.
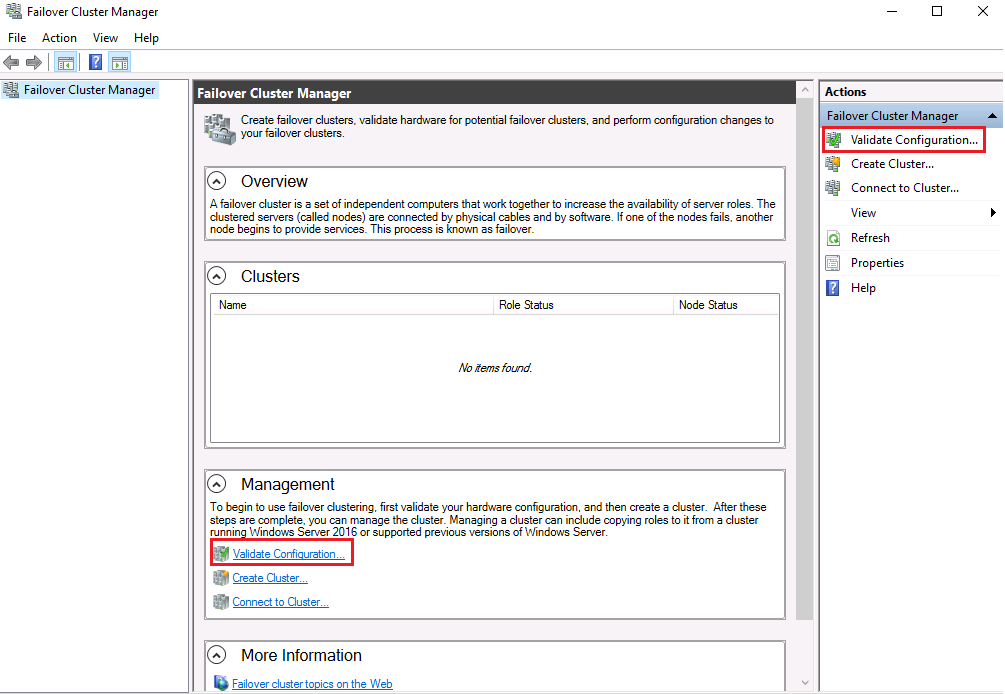
In the Validate a Configuration Wizard, review the content on the Before You Begin Screen and click Next.
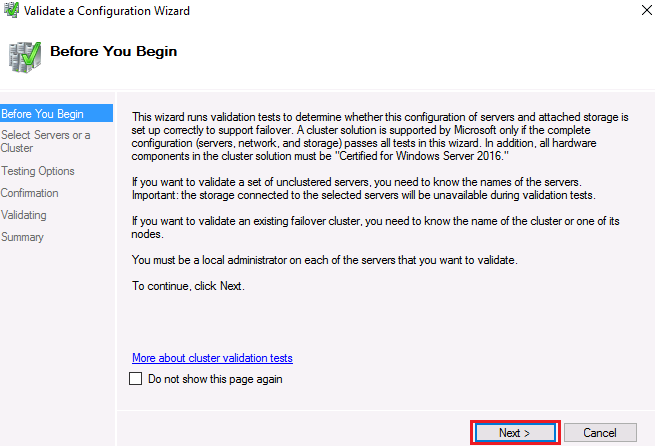
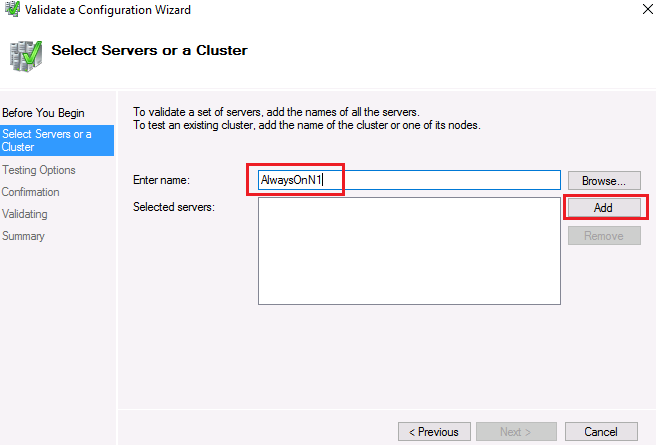
In the Select Servers or a Cluster screen, enter the names of the servers that will be part of the cluster configuration. First enter AlwaysOnN1, and click Add.
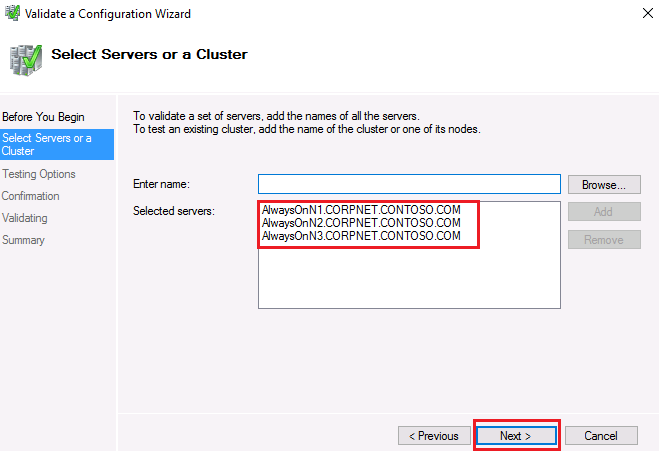
Repeat the Add step for AlwaysOnN2 and AlwaysOnN3 and click Next.
On the Testing Options page, select Run only tests I select and then click Next.
You may have to wait a couple of minutes for the radio buttons to become available.
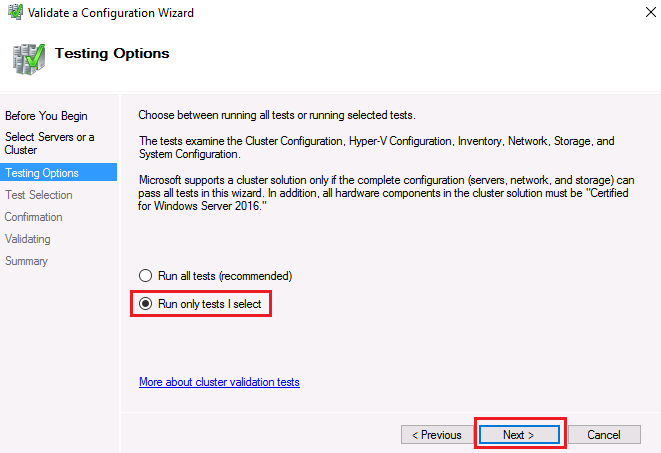
You should always run a validation test before creating your cluster or making configuration changes to your cluster.
Review the test options and click Next.
As we are not setting up Storage Spaces Direct, we will leave the option unselected (default).
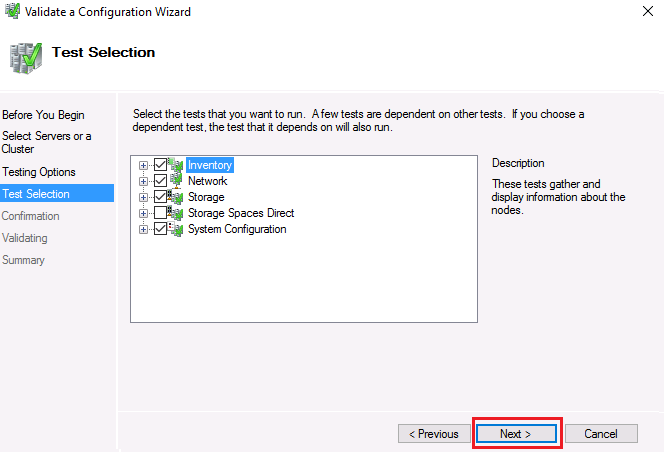
Inventory tests - Provide an inventory of the hardware, software, and settings (such as network settings) on the servers, and information about the storage.
Network tests - Validate that your networks are set up correctly for clustering.
Storage tests - Validate that the storage on which the failover cluster depends is behaving correctly and supports the required functions of the cluster.
Storage Spaces Direct - Validate if the hardware configuration supports Storage Spaces Direct.
System Configuration tests - Validate that system software and configuration settings are compatible across servers.Review the confirmation screen and click Next.
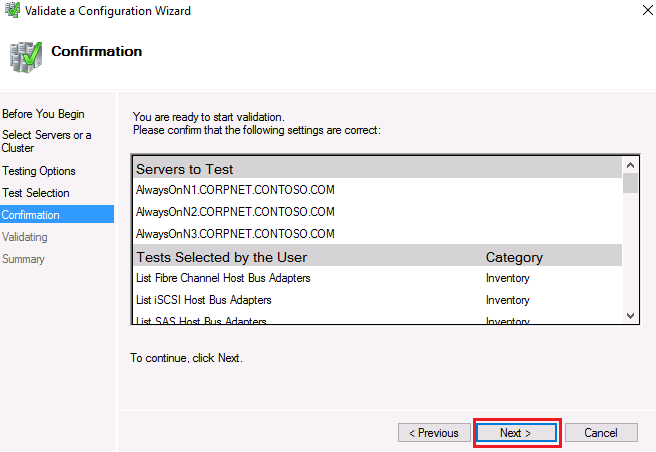
The tests might take a few minutes to complete.
Click the View Report button to review the details of the validation report.
All reports that are generated inside Failover Cluster Manager are stored in %systemroot%\cluster\Reports and can be referred to at any time.
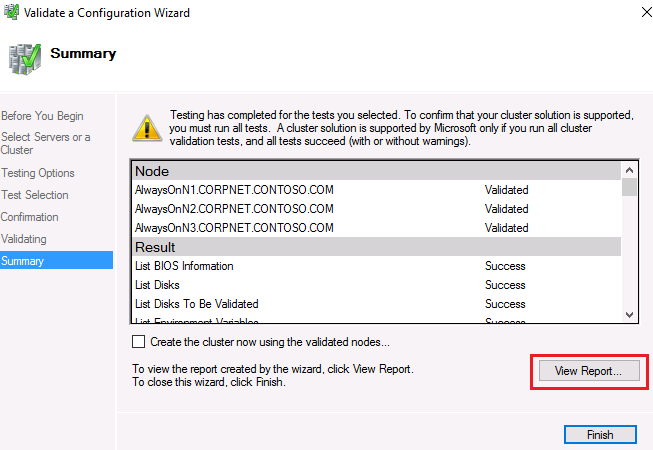
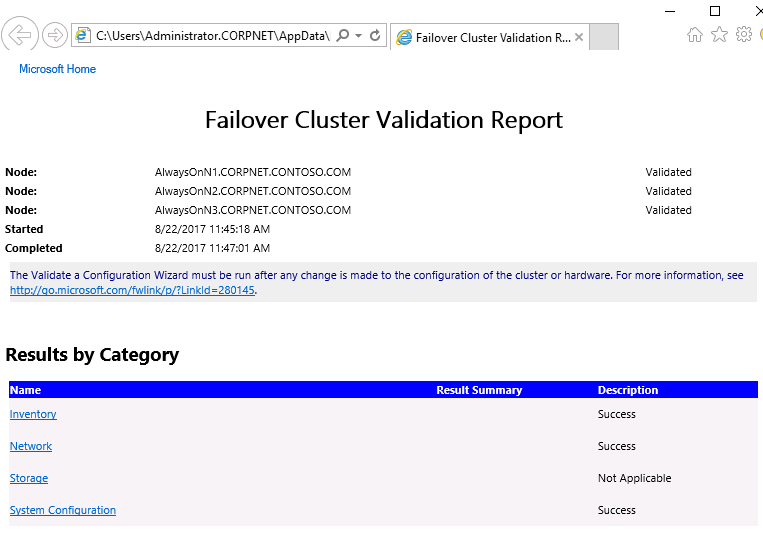
Review the report results, and then close the browser window.
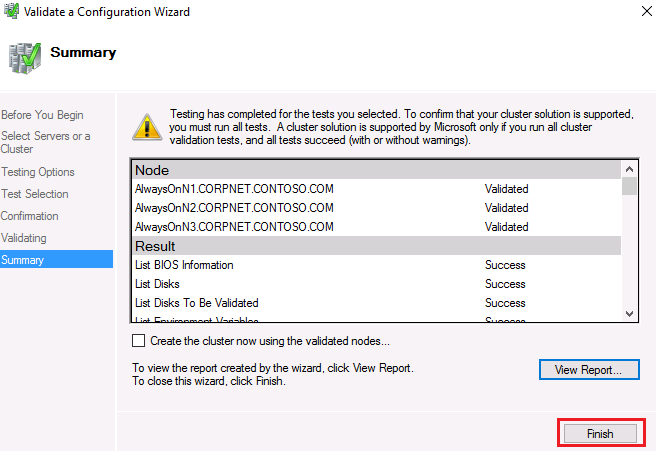
Click on Finish in the Validation Wizard.
It is also possible to initiate the create cluster wizard from this screen by checking the "Create the cluster now using the validated nodes" box.
To run the validation tests using PowerShell, you can use the Test-Cluster cmdlet.
Example: Validate specified nodes
Test-Cluster -Node "AlwaysOnN1", "AlwaysOnN2","AlwaysOnN3"Example: Validate specified nodes for storage tests
Test-Cluster -Node "AlwaysOnN1", "AlwaysOnN2","AlwaysOnN3" -Include "Storage"More details can be found here
Congratulations!
You have successfully completed this exercise. Click Next to advance to the next exercise.
Exercise 3: Creating a 3-node failover cluster
In this exercise, you will learn how to create a 3-node failover cluster
Task 1: Create a Failover Cluster
In this task, you will use the cluster management tools to create a new cluster. The cluster management tools will be run on one node in the cluster but will configure both nodes correctly.
On AlwaysOnN1, ensure that you are signed in as Administrator using Pa$$w0rd as the password.
In the Failover Cluster Manager, click on Create Cluster.
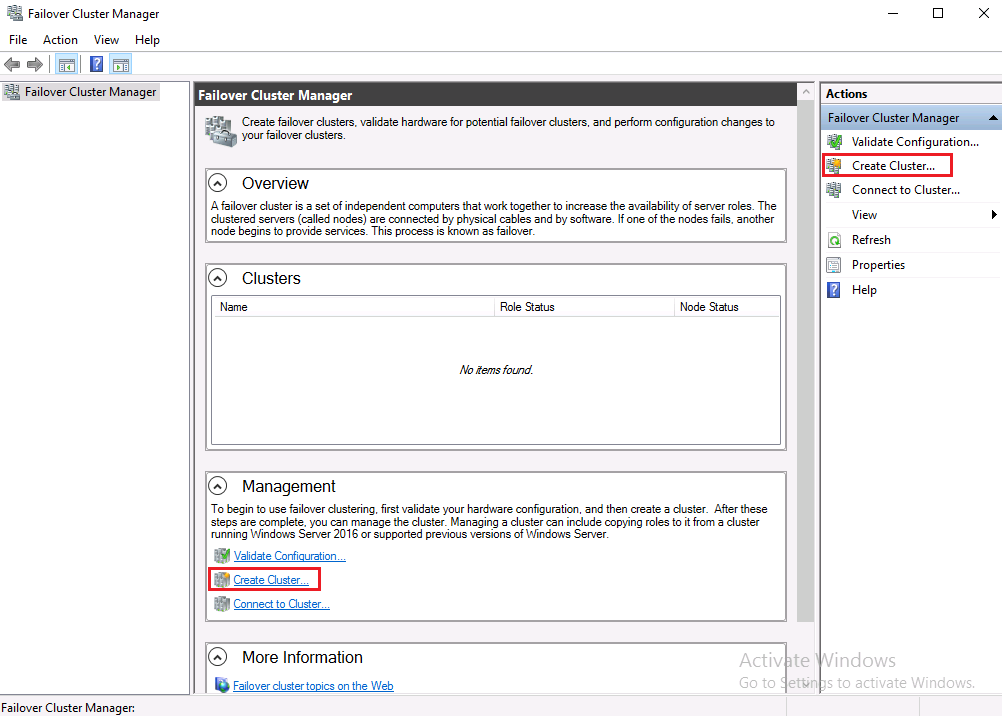
In the Before You Begin screen, review the information and click Next.
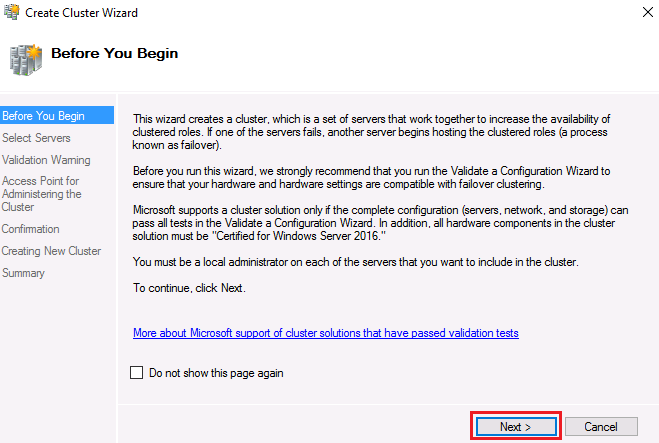
In the Select Servers or a Cluster screen, enter the names of the servers that will be part of the cluster configuration. First enter AlwaysOnN1, and click Add.
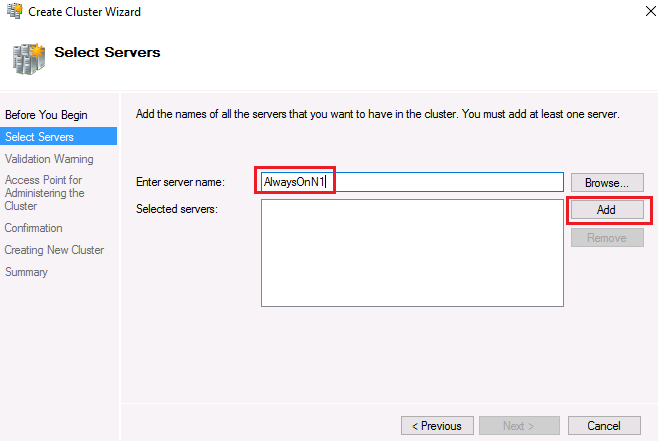
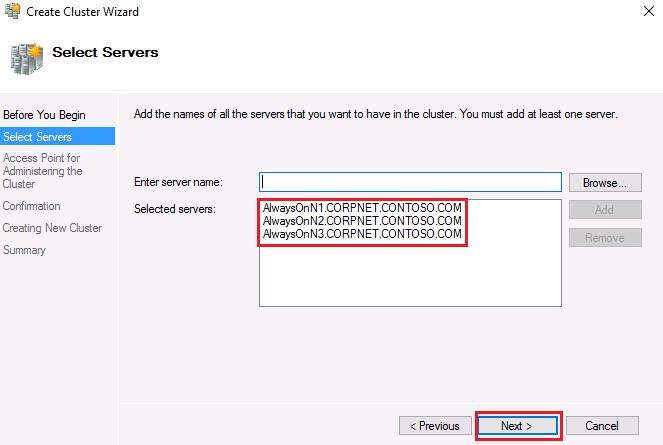
Repeat the Add step for AlwaysOnN2 and AlwaysOnN3 and click Next.
In the Access Point for Administering the Cluster screen, type in a name for this cluster AlwaysOnCluster. This cluster name is also the name that can be used to connect to the cluster to manage it. Type 10.1.1.201 IP address for the 10.1.1.0/24 network and then Click Next.
During cluster creation, this cluster name is registered as the cluster computer object (also known as the cluster name object or CNO) in AD DS. If you specify a NetBIOS name for the cluster, the CNO is created in the same location where the computer objects for the cluster nodes reside. This can be either the default Computers container or an OU.
To specify a different location for the CNO, you can enter the distinguished name of an OU in the Cluster Name box. For example: CN=ClusterName, OU=Clusters, DC=Contoso, DC=com.
If a domain administrator has prestaged the CNO in a different OU than where the cluster nodes reside, specify the distinguished name that the domain administrator provides.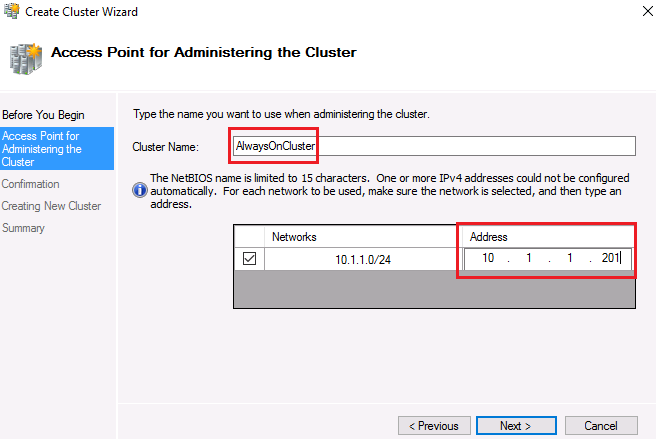
If the server does not have a network adapter that is configured to use DHCP, you must configure one or more static IP addresses for the failover cluster.
Confirm the selections and uncheck the Add all eligible storage to the cluster and click Next.
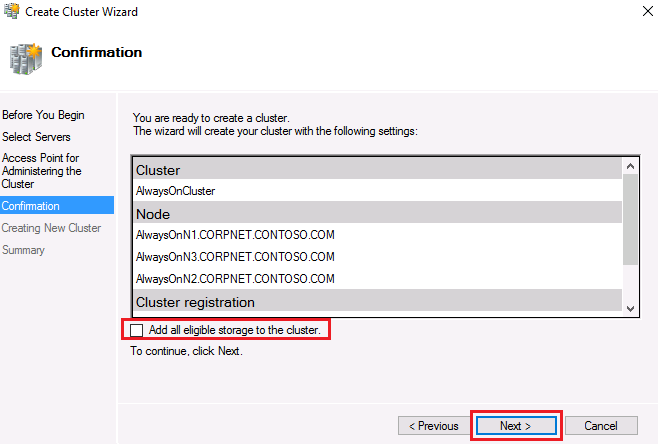
Failing to uncheck the Add all eligible storage to the cluster option will add all the storage (including local SQL drives) to the cluster. We do not want to cluster the local drives and hence it is important that you uncheck Add all eligible storage to the cluster. If you choose not to add all eligible storage to the cluster, you can add specific disks after the cluster is created.
Click View Report to review the warnings, close the browser window, and click Finish.
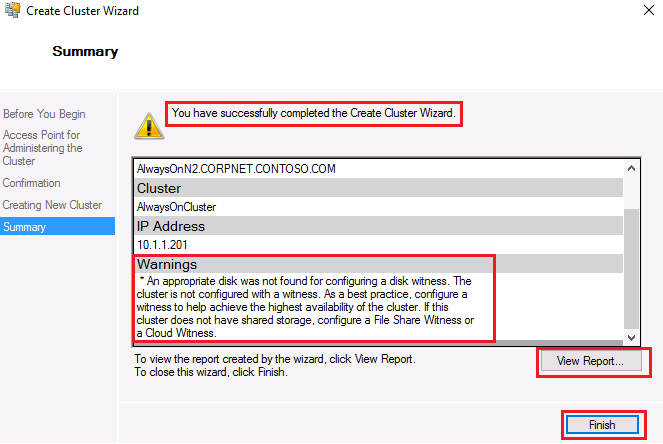
Review the warning. This is expected, as we do not have any shared storage in this environment. We will be configuring a file share quorum witness in a lab exercise later.
To create a cluster using PowerShell, you can use the New-Cluster cmdlet.
Example: Create new cluster
New-Cluster -Name “AlwaysOnCluster” -Node AlwaysOnN1, AlwaysOnN2,AlwaysOnN3 -NoStorageThe above command will create a Windows Server 2022 Failover Cluster with no shared disks. The NoStorage parameter is used as we don't want any storage to be automatically added to the cluster.
More details can be found here
Congratulations!
You have successfully completed this exercise. Click Next to advance to the next exercise.
Exercise 4: Review the 3-node failover cluster using GUI and PowerShell
In this exercise, you will learn how to review the 3-node failover cluster using GUI and PowerShell
Task 1: Review the 3-node failover cluster using GUI
On AlwaysOnN1, ensure that you are signed in as Administrator using Pa$$w0rd as the password.
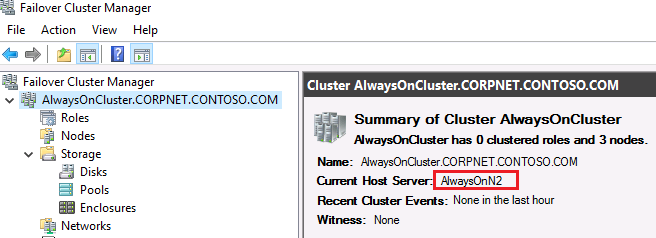
Open Failover Cluster Manager and review information about the cluster. The highlighted show you the Cluster Name, Current Host Server name, Witness information, Networks, Subnets and the Cluster IP Address.
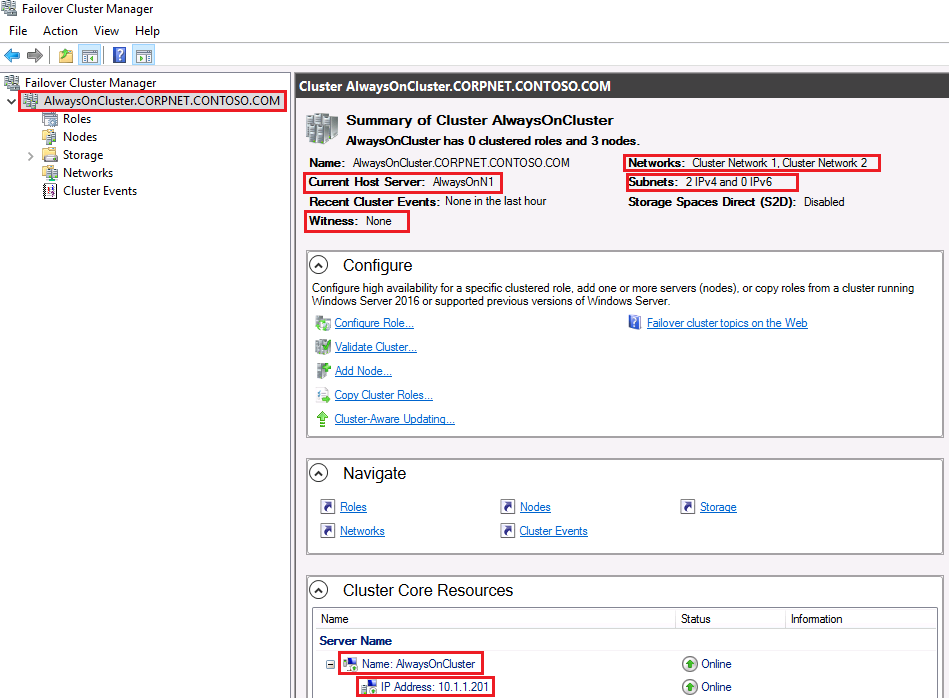
Click of Roles, no roles will show up as no applications have been configured yet on the cluster.

Click on Nodes to see the nodes participating in the cluster.

Click on Storage, no disks will show up as we haven't added any disks to the cluster yet.

Click on Networks to see the networks configured for the cluster.
Note: One of the Network card should be used for Cluster Only and other one for Cluster and Client communication, order doesn't matter

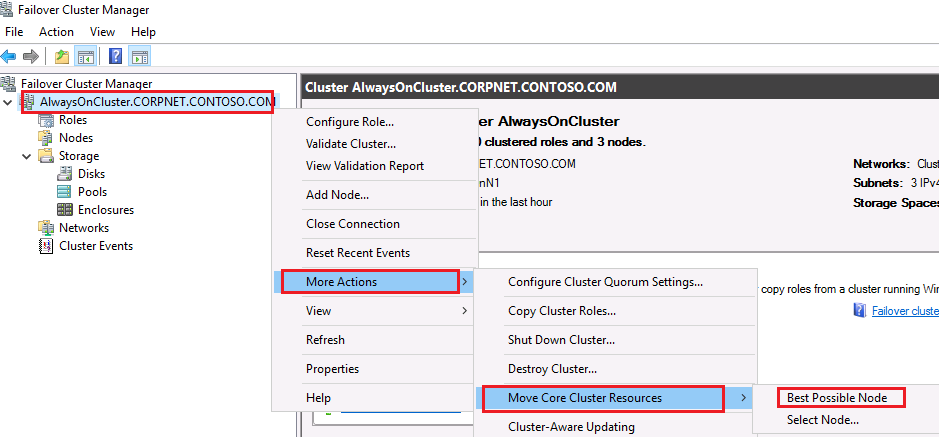
To failover the windows cluster, right click the windows cluster name (AlwaysOnCluster) -> select More Actions -> Move Core Cluster Resources -> Best Possible Node.
The current server would now show as AlwaysOnN2 or AlwaysOnN3.
Task 2: Review the 3-node failover cluster using PowerShell.
On AlwaysOnN1, ensure that you are signed in as Administrator using Pa$$w0rd as the password.
Click on the Start button, then click on Windows PowerShell > Windows PowerShell > More > Run as administrator.
To get a list of all cluster cmdlets, type the following:
PowershellGet-command -module FailoverClusters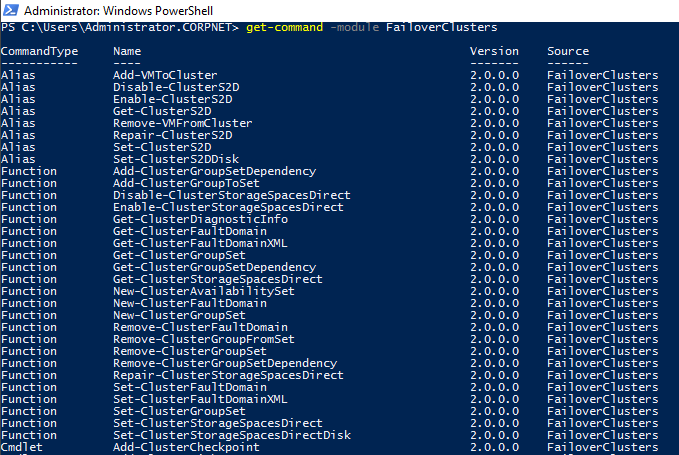
Below are some more useful cluster cmdlets:
Gets cluster node list
PowerShellGet-clusternodeGets cluster resource list
PowerShellGet-clusterresourceCreates a log file for all nodes, or a specific a node, in a failover cluster. They are stored in the %windir%\Cluster\Reports directory on each node of the cluster.
PowerShellGet-clusterlog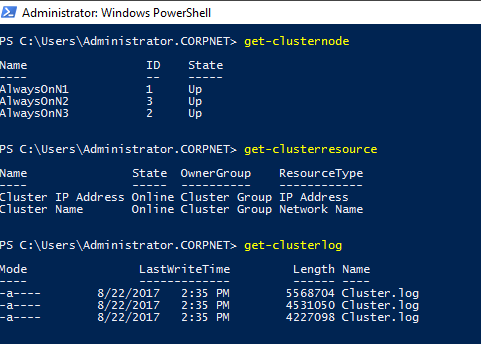
Congratulations!
You have successfully completed this exercise. You can move to the next lab.